

How to use Keil u Version 4 :
First of all you need to know that what is Keil u version 4 .Keil is IDE ( Integrated Development Environment ) , Keil IDE is basically a compiler. In simple words it is a platform in which we can write the program ( code ) in either Assembly language or C language . Note this Post is most important for (M.SC Electronics and Engineering) Students .

We can create the Hex file for 89C51 Microcontroller by using Keil u version 4 very easily . First of you need to download the Kiel u version 4 from Keil official website , link is given below .
After Download and install , you face some problems because you are not familiar with this software but its ok i teach you how to use the Keil u version in steps form .
Step 1 :
Create a New Folder for save the Projects and Remain it .


Step 2 :
Open Keil u version 4 and click on project as shown in below figure and then click on New uVersion Project .
Step 3 and 4 :
After clicking on New uVersion Project give some name to your Project like ( TestProject ) and then press Save button .
Step 5 a :
After save your project Search AT89C51 Microcontroller from Atmel as shown in below figure .
Step 5 b and 6 :
After Expanding now you select AT89C51 Microcontroller , We can also select another Microcontroller like PIC Microcontroller .
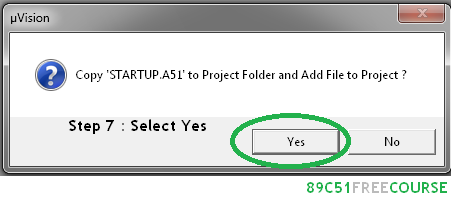
Step 7 :
When promoted , select Yes
Step 8 and 9 :
Now Click on New button as shown in step 8 , after clicking write your code in field shown in step 9
Step 10 :
Below figure shows the color of code before saving the code .In simple words After saving the code , the colors of code will change .
Step 11 and 12 :
Now save the text file ( Code ) with proper extension if you are writing in C language then use ( .C ) extension and similarly ( .ASM ) for Assembly language .
Notice :
Below figure shows how the gets Highlighted According to syntax .....
Step 13 and 14 :
In these steps we add the files ( Code ) into Source Group 1 . Step 13 and 14 show the procedure of adding files into Source Group 1 .
Step 15 , 16 and 17 :
These steps also consists on add the code file into Source Group 1 .
Step 18 and 19 :
After add the code file into Source Group 1 , Right click on Target 1 and go to Option for Target 1 .
Step 20 , 21 and 22 :
These steps are important because without step 21 we can not create the Hex file . By default the Hex file option is disabled you have to enable this option everytime for every project .
Last Step :
Build the project .....
Congratulation .........
Below figure shows how easy we can Build our first project by using Keil U version 4 .
Below Figure shows how to find the Built Hex file . Its very simple go to Folder you created for Keil u version Projects and search (projectname.Hex) .
Ok friends these are the simple steps for successful compilation and generation of Hex file .I hope you have create you first Hex file .If you have any problem in above steps contact me . For more updates Like my 89C51 free Course Facebook page .

Related Posts :


very good
ReplyDelete89C51 Programming Software Keil U Version 4 >>>>> Download Now
ReplyDelete>>>>> Download Full
89C51 Programming Software Keil U Version 4 >>>>> Download LINK
>>>>> Download Now
89C51 Programming Software Keil U Version 4 >>>>> Download Full
>>>>> Download LINK