Monday, October 5, 2015

How to Install and Crack Proteus 7.6


What is Proteus 7.6 and How to install it :


Before Installing the Proteus 7.6 you need to know that what is Proteus ?  The answer is , Proteus is a Simulator and 7.6 is the most important version of Proteus. In simple words we can say that , by using the Proteus 7.6 Simulator we can makes Circuits , Projects and PCB . Even we can RUN the projects and Circuits . For more information visit Proteus official site    HERE

OK Friends now im going to teach you How to install the Proteus 7.6 .After installing the Proteus 7.6 ,  I will teach you How to Use Proteus 7.6 , but in next Post imean in Day 6 .The Installation of Proteus 7.6 is very easy because im here to teach you in easy steps method . Note this post is very important for M.SC Electronics and Engineering Students .


Step 1 : 


First step is , Download the Proteus 7.6 crack version from secure link .Its very simple Click      HERE   

After Downloading and Extracting . Make a new folder and named as Proteus 7.6 + Crack and past these two extracted files into this folder just like shown in below figure .
( Note if you don't have Winrar then first you download Winrar software   HERE )


Step 2 :      After this , Open Setup76 and click on YES as shown in below figure .


Step 3 :   Now Press OK for Windows Update standalone Installer ..


Step 4 : Press Next 


Step 5 :   Press Yes 


Step 6 : Select Use a locally installed key and Press Next 


Step 7 :  Press Next 


Step 8 : Click on Browse for Key file 


Step 9 : Select Grassington North Yorkshine.lxk file and Press Open . Note this is key file , placed in Crack folder 


Step 10 : Press Install 


Step 11 : Press Yes and After installation of key close this window 


Step 12 : After Installing the Key . Open setup Wizard and Press Next 


Step 13 : In this step Choose the location you want to install and press Next 


Step 14 : Select upper three options and press Next 


Step 15 : Select Accessories and Press Next 


Step 16 : Proteus Program is now installing .....


Step 17 : Press Finish 


Step 18 : In this step we are going to crack Proteus 7.6 . 


Step 19 :  As you people knows that , Windows 7 is very popular operating system if you are using Windows 7 then open crack file as Administrator . 


Step 20 :   Press Update 


Step 21 : Press OK 


Step 22 : Open ISIS Shortcut of Proteus 7.6 


Last step : Press No and Enjoy the Proteus 7.6 Version ...


Ok friends these are the simple steps for successful Install the Proteus 7.6 . I hope you can understand the procedure of installation of Proteus 7.6 .If you have any problem in above steps contact me . For more updates Like my 89C51 free Course Facebook page . 


Related Posts :  
                         What is Microcontroller 
                         What is 89C51 Microcontroller 

Tuesday, September 22, 2015

89C51 Programming Software Keil U version 4


How to use Keil u Version 4 :


First of all you need to know that what is Keil u version 4 .Keil is IDE ( Integrated Development Environment ) , Keil IDE is basically a compiler. In simple words it is a platform in which we can write the program ( code ) in either Assembly language or C language . Note this Post is most important for (M.SC Electronics and Engineering)  Students .


We can create the Hex file for 89C51 Microcontroller by using Keil u version 4 very easily . First of you need to download the Kiel u version 4 from Keil official website , link is given below .


After Download and install , you face some problems because you are not familiar with this software but its ok i teach you how to use the Keil u version in steps form

Step 1 : 

Create a New Folder for save the Projects and Remain it .


Step 2 : 

Open Keil u version 4 and click on project as shown in below figure and then click on   New uVersion  Project . 


Step 3 and 4 : 

After clicking on New uVersion Project give some name to your Project like ( TestProject ) and then press Save button .


Step 5 a :


After save your project Search AT89C51 Microcontroller from Atmel as shown in below figure .


Step 5 b and 6  : 

After Expanding now you select AT89C51 Microcontroller , We can also select another Microcontroller like PIC Microcontroller . 


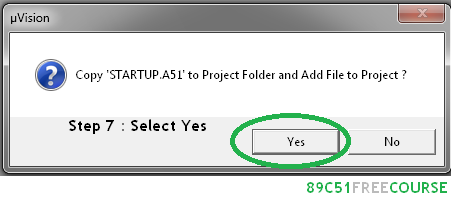
Step 7 : 

When promoted , select Yes 


Step 8 and 9 : 


Now Click on New button as shown in step 8 , after clicking write your code in field shown in step 9


Step 10 : 


Below figure shows the color of code before saving the code .In simple words After saving the code , the colors of code will change .


Step 11 and 12 : 

Now save the text file ( Code ) with proper extension if you are writing in C language then use ( .C ) extension and similarly ( .ASM ) for Assembly language . 


Notice : 

Below figure shows how the gets Highlighted According to syntax .....


Step 13 and 14 : 


In these steps we add the files ( Code ) into Source Group 1 . Step 13 and 14 show the procedure of adding files into Source Group 1 .


Step 15 , 16 and 17 :


These steps also consists on add the code file into Source Group 1 . 


Step 18 and 19 :


After add the code file into Source Group 1 , Right click on Target 1 and go to Option for Target 1 . 


Step 20 , 21 and 22 : 

These steps are important because without step 21 we can not create the Hex file . By default the Hex file option is disabled you have to enable this option everytime for every project .


Last Step : 


 Build the project .....


Congratulation .........
Below figure shows how easy we can Build our first project by using Keil U version 4 .


Below Figure shows how to find the Built Hex file . Its very simple go to Folder you created for Keil u version Projects and search (projectname.Hex) .


Ok friends these are the simple steps for successful compilation and generation  of Hex file .I hope you have create you first Hex file .If you have any problem in above steps contact me . For more updates Like my 89C51 free Course Facebook page .   


Related Posts :  
                         What is Microcontroller 
                         What is 89C51 Microcontroller 
                         Prgramming Languages Used In 89C51 Microcontroller 
                         How to Install Proteus 7.6 


Monday, September 21, 2015

Programming languages used in 89C51 Microcontroller


Programming languages used in 89C51 Microcontroller  :

The 89C51 Microcontroller programmed in three programming languages .

1 : Assembly Language 

First any very basic and old language is Assembly language , this is language for beginners Assembly language is referred to as a Low level language  . This language deals Directly with the internal structure of the CPU due to this the Assembly language provides totally control to user .Assembly language is not fully understandable (mean we do not add the human understandable words in Assembly codes just like in C language),  due to this we face problems when we write a big program(code) .As we know that the RAM of 89C51 Microcontroller is 128 Bytes and 4K byte code space , due to this we need small size codes ( programs ) . By using Assembly language we can make small size codes and this is the main advantage of Assembly language.

2 : C language 

2nd and , today most important and my best language is C language . This language provides very easy platform to user , to write bigger and professional codes(programs) . In C language we can use Human understandable words due to this it is easy language for writing difficult codes .We can not control all parts (Registers , Memory addresses etc etc ..)  of Microcontroller though C language coding , but we can perform all tasks by using this language .One and only disadvantage of c language is that , it gives large code size .
In case of 89C51 Microcontroller we must write code lower than 4K byte , but its ok i teach you how to reduce the size of coding .

3 : C++ language 

3rd and most popular language is C++ language it is a higher level language . C++ is very easy language for writing professional codes . It is very advanced language so we can add libraries to our code . Codes size is larger this language .    


The above figure shows the advantage and disadvantages of basic three programming languages .


Related Posts :

                      What Is Microcontroller 
                      What Is 89C51 Microcontroller 
                                   89C51 Programming Software Keil U Version 4


Wednesday, September 16, 2015

What is 89c51 Microcontroller


The 89C51 Microcontroller:-


The 89c51 is best microcontroller for beginners it is a low power and high performance 8-bit microcontroller.The 89c51 have 4K bytes of flash programmable and erasable read only memory (PEROM) .The 89c51 is belong to Atmel's 8051 family but 89c51 is advanced form of 8051 .

Features of 89C51 Microcontroller :-

  • 4K bytes of In-System Reprogrammable Flash memory
  • Fully static Operation : 0Hz to 24MHz
  • 128 x 8-bit internal RAM 
  • 32 programmable I/O Pins 
  • Two 16-bit Times/Counters ( Timer 0 ,Timer 1 )
  • One programmable Serial port 
  • Six interrupt sources 
  • Operating  voltage = 5V                                                                                                                                                                                                                                                                        

Pin configuration of 89C51 Microcontroller :-  


The above figure shows the Pin configration of 89c51 Microcontroller , As shown from figure the 89c51 Microcontroller contains Four I/O ports three ports are multi function ports ( Port0 , Port1 and Port 3 ) but Port 1 is single function port .All Ports are 8-bit ports and upon rest all ports are consider as input . 

PORT 0 : 

The Port 0 can be used as input or output , the Port 0 is open drain port due this face each pin must be connected to 10K ohm pull up resistor . The Port 0 dual functional (AD0-AD7) Port mean when we connect the 89c51 Microcontroller  to an external memory the Port 0 provides both address and Data .


PORT 1 :

The Port 1  can be used as input or output , this Port can not need any pull up resistors it had already pull up resistors internally .Port 1 is single functional Port . 

PORT 2 :

The Port 2 can be used as input or output , just like Port 1 , Port 2 can not need any pull up resistors it had already pull up resistors internally . Port 2 is dual functional (A8-A15) Port , mean it provides upper 8-bit address to external memory (upper byte) .In simple words Port 0 and Port 2 provides the 16-bit address to external memory , when external memory is present . 

PORT 3 :

Port 3 is very important port just like other three ports the Port 2 can be used as input or output and also no need any pull up resistor . Port 3 is also a Dual functional any very important functions Port .


Reset Pin :

The Reset Pin is active high pin , we will use two circuits for system reset one is manual reset and other is power on reset .

1: Manual Reset 


2 :  Power On Reset


Crystal Oscillator :

To make the 89C51 Microcontroller functional we need to connect the  Crystal oscillator to pin 18 and 19 . Most commonly used crystal oscillators are 12 MHz and 11.0592 MHz .

VCC and GND :

The pin 40 is the VCC ( need to connect with +5V ) and pin 20 is Ground pin ( need to connect with 0V or negative terminal of battery or charger) .

EA/VPP , ALE/Prog and PSEN :

Pin 31 , EA ( External Access Enable ) this pin is normally connected to Vcc but when we connect this pin to GND the Microcontroller execute External ROM program(code).
VPP( Programming enable Voltage ) is normally connected to +5V .

Pin 30 ALE (Address Latch Enable ) is used for demultiplexing the address and data bus ALE pin is used when external memory is connected .

Pin 29 PSEN ( Program store Enable ) this pin provides an output signal  that enables external program code( memory ) , this Pin is used when external memory is connected . 


Related Posts : 
                 

       What is Microcontroller